Introduction
Ever feel too tired in the morning to make something healthy but still want to stay on track? Smoothie Recipes for Energy and Weight Loss are a simple way to fuel your body without spending much time in the kitchen. They’re quick, refreshing, and easy to adjust with whatever you have at home. I often blend one together when I need something light but filling before starting my day. These smoothies are loved because they balance taste and nutrition, helping you feel satisfied while keeping things simple for busy mornings, light lunches, or even evening cravings.
Why You Will Love This Recipe
Struggling to find something healthy that doesn’t feel boring or repetitive? These smoothies bring together fresh flavors, natural sweetness, and a creamy texture that feels comforting without being heavy. Smoothie Recipes for Energy and Weight Loss are great for busy days, easy to prep ahead, and flexible enough to fit your taste. You can swap fruits, adjust sweetness, or make them thicker or lighter depending on your mood. They’re budget-friendly and perfect for using leftover fruits. Plus, they feel like a treat while still supporting your daily routine, making them easy to save and come back to anytime.
Ingredients
Choosing ripe fruits makes all the difference—they blend smoother and taste naturally sweeter.
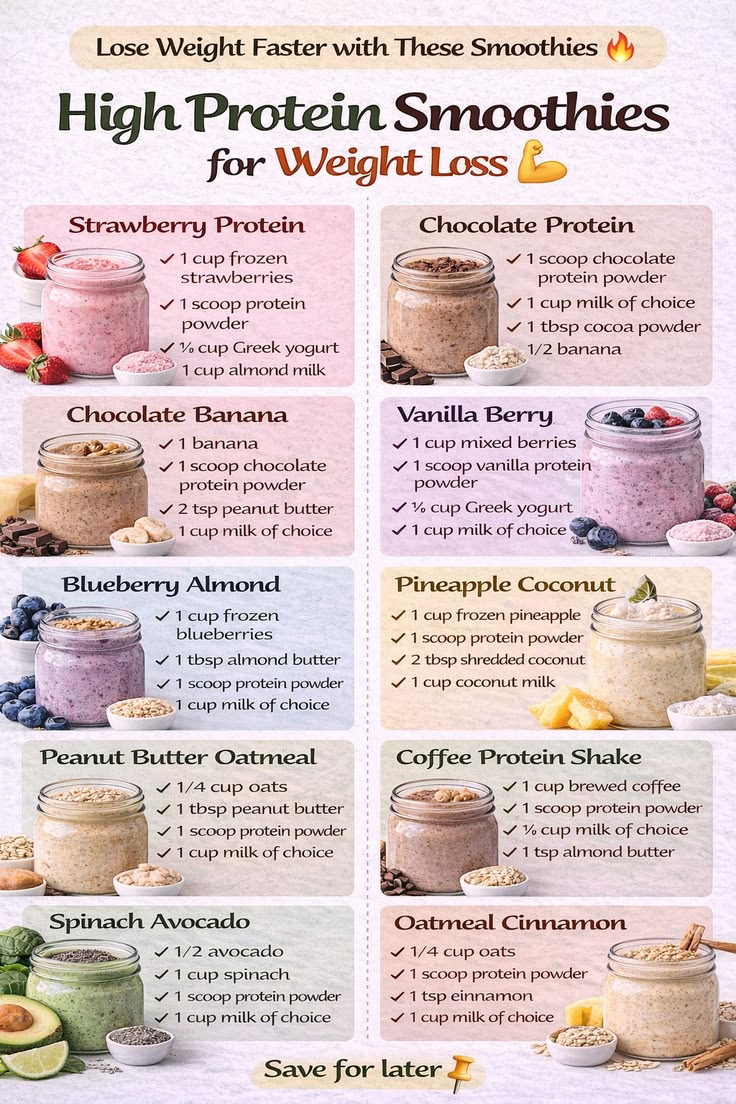
- 2 bananas (medium, ripe)
- 1 cup spinach leaves (fresh)
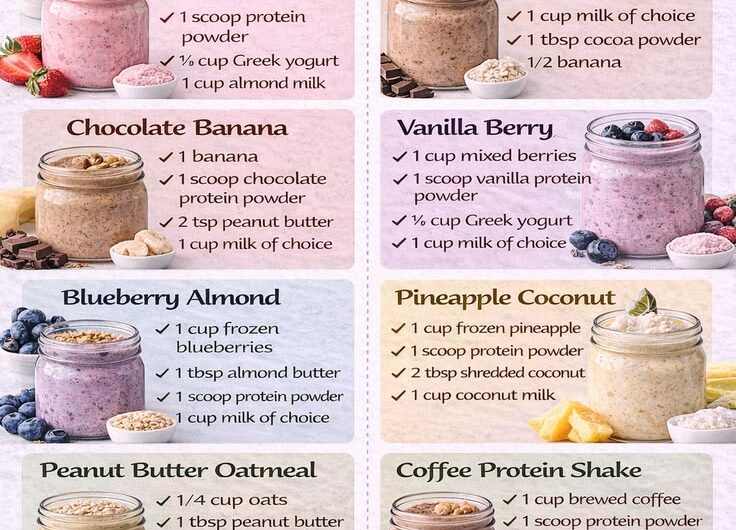
- 1 cup mixed berries (fresh or frozen)
- 2 cups low-fat milk or almond milk
- 1 cup plain yogurt
- 2 tablespoons honey (optional)
- 1 tablespoon chia seeds
- 1/2 teaspoon cinnamon powder
(For 2 people, simply use half of each ingredient. For more than 4 people, double or adjust quantities based on servings.)
Instructions
Step 1: Preparation –
Feeling rushed and unsure where to begin? Start by washing the spinach and berries well, then peel the bananas and slice them into chunks. Gather all ingredients near your blender so everything is ready, making the process quick and stress-free.
Step 2: Main Cooking Process –
Worried about getting the right texture? Add milk and yogurt into the blender first, then toss in bananas, berries, and spinach. This layering helps everything blend smoothly without chunks, giving you a creamy and even consistency.
Step 3: Combining Ingredients –
Not sure when to add extras? Sprinkle chia seeds and cinnamon, then drizzle honey if you like a touch of sweetness. Blend everything until the mixture looks silky and thick. For 2 servings, reduce blending time slightly since there’s less volume.
Step 4: Finishing & Final Simmer –
Concerned about thickness or taste? Pour into glasses and check consistency—add a splash of milk if too thick. For larger batches, blend in parts to avoid overfilling. Serve immediately while fresh, or chill for a cooler, refreshing drink.
Why This Recipe Works for Busy Days
Running out of time but still want something healthy? This smoothie comes together in minutes and doesn’t need cooking or complicated steps. You can prep ingredients the night before and blend quickly in the morning. It also stores well for later, making it perfect for meal prep or quick energy during a busy day.
Tips & Tricks
- Ever wonder why your smoothie turns watery? Always add frozen fruits or a few ice cubes to keep it thick and refreshing. If making for 2 people, use fewer ice cubes; for larger servings, increase slightly to maintain consistency without diluting flavor.
- Struggling with a bland taste? Balance is key—use naturally sweet fruits like bananas to avoid adding too much sugar. For smaller portions, even a little honey goes a long way, while bigger batches may need a bit more to keep flavors balanced.
- Finding your smoothie too thick to blend? Add liquid slowly instead of all at once. For 2 servings, start with less liquid, while for more than 4, increase gradually so the blender doesn’t overflow or lose texture.
- Not sure how to keep it fresh longer? Store in airtight bottles and fill to the top to reduce air exposure. Smaller portions stay fresh longer, while larger batches should be divided into separate containers for better storage.
Variations
Meaty Version
Want something more filling after a workout? Add a scoop of protein powder or a spoon of peanut butter for extra richness and energy. For 2 people, use a smaller scoop, while larger servings can handle more without overpowering the flavor.
Vegetarian Option
Looking for a lighter, plant-based option? Replace yogurt with coconut yogurt and use almond or oat milk. This keeps it creamy while staying dairy-free. Adjust quantities easily—half for 2 servings or increase for family-sized portions.
Ingredient Swap
Don’t have berries at home? Swap them with mango, apple, or pineapple for a different flavor profile. Each fruit brings its own sweetness, so adjust honey as needed depending on your portion size.
Flavor Boost
Want to change things up a bit? Add a pinch of ginger or a few mint leaves for freshness. For smaller servings, use just a hint, while larger batches can take more without becoming too strong.
Serving Suggestions
- Morning Boost Bowl
Trying to make breakfast more exciting? Pour the smoothie into a bowl and top with sliced fruits, oats, and seeds. For 2 people, keep toppings simple, while larger servings can include more variety for a colorful, filling start. - On-the-Go Drink
Need something quick before heading out? Pour into travel bottles for an easy grab-and-go option. Smaller portions are perfect for one person, while bigger batches can be shared among family members. - Light Evening Snack
Looking for something light but satisfying at night? Serve chilled with a sprinkle of cinnamon on top. Adjust portion size based on appetite—half servings for light cravings or full glasses for more filling snacks. - Post-Workout Refuel
Want a refreshing drink after exercise? Serve cold with extra protein add-ins. For 2 servings, keep it light, while for more people, increase ingredients to keep everyone satisfied.
Storage Instructions
- Fridge Storage
Wondering how long it stays fresh? Store smoothies in airtight containers in the fridge for up to 24 hours. Smaller portions maintain freshness better, while larger batches should be divided to keep flavor and texture intact. - Reheating
Thinking about warming it up? Smoothies are best served cold, but if needed, let it sit at room temperature briefly instead of heating. Smaller servings adjust quicker, while larger ones take more time. - Freezing
Want to save for later? Freeze in portions using freezer-safe containers. For 2 servings, freeze in small jars, while larger batches should be split to make thawing easier and faster. - Make-Ahead Tips
Trying to save time in the morning? Prep all ingredients and store in freezer bags. Blend when needed. Smaller packs are great for single servings, while bigger ones can be used for family portions.
Recipe Timing
Prep Time: 10 minutes
Cook Time: 0 minutes
Rest Time: 0 minutes
Total Time: 10 minutes
Nutrition Information (Approximate)
Worried about calories or nutrients? Each serving contains around 180–250 calories, with 6–10g protein. It’s also a good source of fiber and vitamins from fruits and spinach. Values may vary depending on ingredients and portion sizes.
FAQs
Can I make this smoothie ahead of time?
Yes, store it in the fridge for up to 24 hours. For best taste, shake before drinking.
Why is my smoothie too thin?
You may have added too much liquid. Try adding frozen fruit or less milk next time.
Can I replace yogurt?
Yes, use plant-based yogurt or skip it and add more banana for creaminess.
How do I make it thicker?
Add ice, frozen fruits, or reduce liquid slightly for a richer texture.
How should I store leftovers?
Keep in airtight containers and refrigerate. Smaller portions stay fresher longer.
How can I adjust the sweetness?
Add or reduce honey based on taste. Riper fruits also naturally increase sweetness.
Conclusion
Finding something quick, healthy, and satisfying can feel tricky on busy days, but Smoothie Recipes for Energy and Weight Loss make it much easier. They’re flexible, easy to prepare, and fit into everyday routines without stress. You can adjust ingredients, flavors, and portions based on your needs, making them a reliable go-to option. Whether you enjoy them in the morning or as a light snack, they bring comfort and freshness in every sip. Once you try them, it’s easy to keep coming back and making them your own.
Recipe Card
Smoothie Recipes for Energy and Weight Loss
4
servings10
minutes180–250
kcalA quick and refreshing smoothie packed with fruits, spinach, and creamy yogurt. Perfect for busy mornings or light snacks, and easy to adjust for any number of servings.
Ingredients
2 bananas (ripe)
1 cup spinach
1 cup mixed berries
2 cups milk or almond milk
1 cup yogurt
2 tbsp honey (optional)
1 tbsp chia seeds
1/2 tsp cinnamon
(Use half for 2 people. Double for more than 4 servings.)
Directions
- Wash spinach and berries. Peel and slice bananas.
- Add milk and yogurt to blender first.
- Add fruits, spinach, chia seeds, cinnamon, and honey.
- Blend until smooth and creamy.
- Adjust thickness with milk if needed.
- Pour into glasses and serve fresh.
Enjoy a simple, fresh smoothie anytime you need quick energy.